Improving the practice and performance of contemporary music
Practical difficulties
Finding the coils
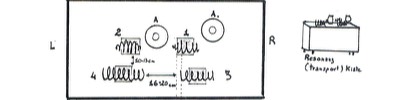
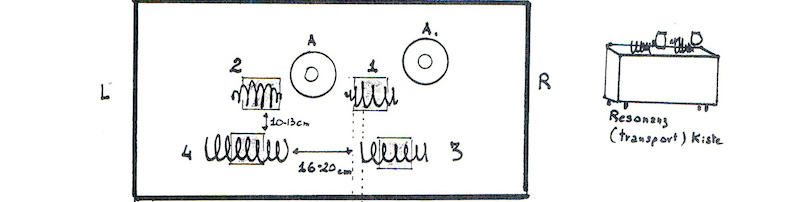
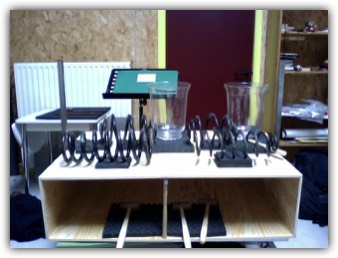
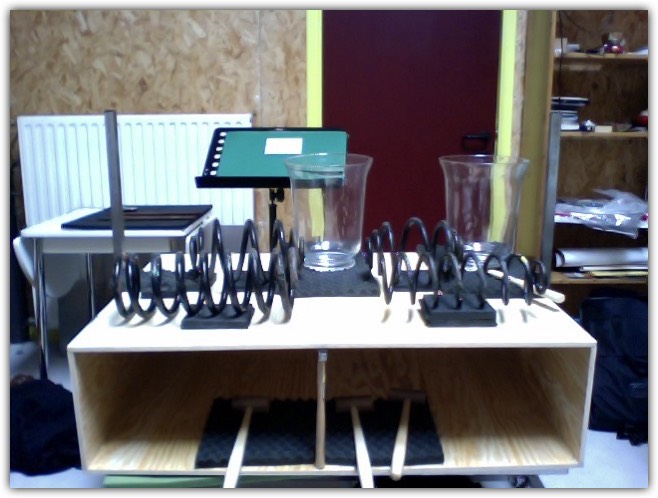
Four different coils are needed. The set I used is the following: Coil 1: Ford Fiesta – Coil 2: Opel Astra – Coil 3: Audi A4 – Coil 4: Bus.
Other car brands can be used as well. The only points that are imperative: Coils 1 and 2 should be almond-shaped and have 3 main rings in the middle to execute the part properly; Coils 3 and 4 are straight. Coil 3 should have a minimum 7 playable rings. The rings should not be too thick and in a way flexible to perform certain parts in the piece. Coil 4 should have 8 playable rings. This last coil has very thick rings, but one must make sure the rings aren’t too thick. Otherwise the low resonance that is produced by playing the coil with the wrist doesn’t come out properly. Coil 1 is preferably the highest in pitch, working down to coil 4.
If the coils are dirty or rusty when purchased, cleaning all the dirt and rust and treating them with an anti-rust spray before mounting and playing them will make the sound and resonance of the coils better and extend the life of the hammers and foam.
Finding the foam
Finding the right foam to mount the coils was the most difficult part in preparing this piece. After trying all kinds of Styrofoam, isolation foam, rubber mats and combining these with each other, using felt extensions, making constructions of free suspension systems etc., I finally found a little piece of the densest type of foam that manufacturers use to construct the inside of flight cases. This kind of foam produces the least noise and lets the coils resonate at their best. I was also lucky to find flight case foam that was adhesive on one side, so it was easy to mount on a flat surface and thus to the resonance box.
Mounting the coils and foam to the resonance box
There is only one kind of glue that really works to mount the coils to the foam: normal super glue - the kind that dries in a few seconds. (Be careful not to stick the coils to your hands!) Other types of glue like contact glues etc. tend to “eat away” at the foam or are too flexible; this can result in unwanted noise and instability in the coils. My foam was sticking by itself on one side, so easy to mount to the box. When this is not the case, make sure the foam can’t slide over the wooden box while playing the coils; this produces unwanted noise. The best is to stick the foam directly to the box with super glue and secure the edges with gaffer tape. Alternatively you can use tape that is adhesive on both sides and cover the entire bottom of the foam with it.
Another solution that does not involve glue is to use a hybrid polymer sealant like TEC 7 on the contact points of the coils to the foam. If you let it dry out it works as a kind of “anti-slip” patch on the foam and reduces unwanted noise of the foam a lot. In live situations I use a bit of fresh sealant to “glue” the biggest coil to the foam so the effect that involves the wrist (see later) can be brought out more.
When mounting the foam and coils to the box, be careful about the distances between the coils. Especially between coils 3 and 4 you need enough space to play a lateral movement, hitting the two coils alternately with each side of the hammer. This is the best initial position to start setting up, to check this lateral movement and the ideal movement you need for it. After that, make sure the inner sides of coils 1 and 2 are on the same level as the inner sides of 3 and 4 and you are basically set to go.
Constructing the resonance box
To make the coils “sing”, you need a resonance box to “amplify” the resonance of the coils. This can be easily constructed yourself with cheap plywood. I made a box of 1000x710x270mm, made of Polish pine. For this you need the following boards: 2 times 1000x700x10mm, 1 time 270x1000x10mm and 4 times 700x250x10mm. 2 of the 4 of the latter boards are used as reinforcement at the inside of the box, because the coils are heavy when mounted and the wood tends to bend in the middle if not reinforced. Everything can be either glued or nailed together or a combination of the two.
Finding the right glasses
Ideally, the glasses are tuned in A and are two of the same pitch and sound colour. (The A can also help you find your intonation through the piece for the singing parts) Be careful to take glass that is not too thick or not to thin. Glasses that are too thin have better resonance but are easy to break. Glasses that are too thick glasses tend to be too short of resonance. A practical solution, especially for practising purposes is to use glasses made of Pyrex, which is more resistant. I found my glasses in the candle department of Ikea; they can be tuned down by pouring water into the glasses. Also flower shops normally have a nice variety of well-sounding vases. Don’t forget to use soft foam to put under the vases, ideally acoustic isolation foam, to get the maximum resonance and the least side noise out of the glasses.